Christmas Banner


I'm so excited for Christmas!  I love to get out my Christmas decorations and bring some holiday cheer to our small apartment.  Banners are my new thing.  They are so fun to hang from my picture ledge!  I have a Halloween banner and I made my own Thanksgiving banner (see it HERE) so, I decided to complete the set and make a Christmas banner too!


For this project you'll need:

Burlap

Paint (I used gold, silver, dark green, red, white, and black)

Twine

Sewing machine and brown thread (or you could hot glue it!)


 I cut my banner into different shapes.  For the longer ones I cut out pieces about 12 x 5 inches wide and then folded them in half.  The shorter ones are 10 x 5 inches wide.  The "T" is about 14 x 5 inches and then I cut the bottom into a dull point.  For the "C" and the "S" at the end,  I took a longer one and cut a small v shape out of the middle.


I started off by painting each of my squares white and then waiting for them to dry.  For the polka dots, I found this really awesome brush at Hobby Lobby that is already shaped like a polka dot.  The holly and the tree I drew myself and cut them out of card stock to create my stencils.  The snowflake and the damask were both Google searches that I printed on card stock.  Bebas Neue is the font I used for all the letters.  

When everything was dry, I got out the sewing machine and sewed the sides and the bottom of each square.  Don't sew the top or you'll have a hard time threading your twine through!


I thought it was a pretty fun project and now my apartment looks a little more Christmasy! :) Merry Christmas!



Thankful

I don't have a lot of decorations for Thanksgiving and the hubby says it's too early for the Christmas tree, sooooooo I decided to get creative.  I drew this wreath and finished it up in Picmonkey.  You can find and print it HERE.


And because I couldn't decide between the two different wreaths I made, I decided to put up both. You can find this second print HERE.


I also made a "Thankful" banner.  You can find and print it HERE.  I printed it on card stock and then mod podged it onto brown paper bags and hung it on twine.


Happy Thanksgiving!

Little Red and The Big Bad Wolf


I love, love, LOVE Halloween!  I love the corn mazes, the costumes, the pumpkins,... everything!  When we were little, my mom used to make our costumes.   Since I've been working with the sewing machine a lot for my quiet book (posts coming soon!), I felt confident enough to attempt Lucy's costume on my own.  I found the tutorial for Lucy's red riding hood cape at The Modest Homestead HERE.  The only thing I did differently was I made the front part of the hood an inch longer so I could fold it back and sew it over the flower fabric for a cleaner looking edge. I'm so happy with how it turned out!


The wolf ears were really simple to make.  I did a little bit of sewing, but honestly, you could do it all with a glue gun. 

All you'll need is:

black felt
gray felt
white felt
headband
pipe cleaners
and a glue gun

You can find and print the pattern I drew HERE.

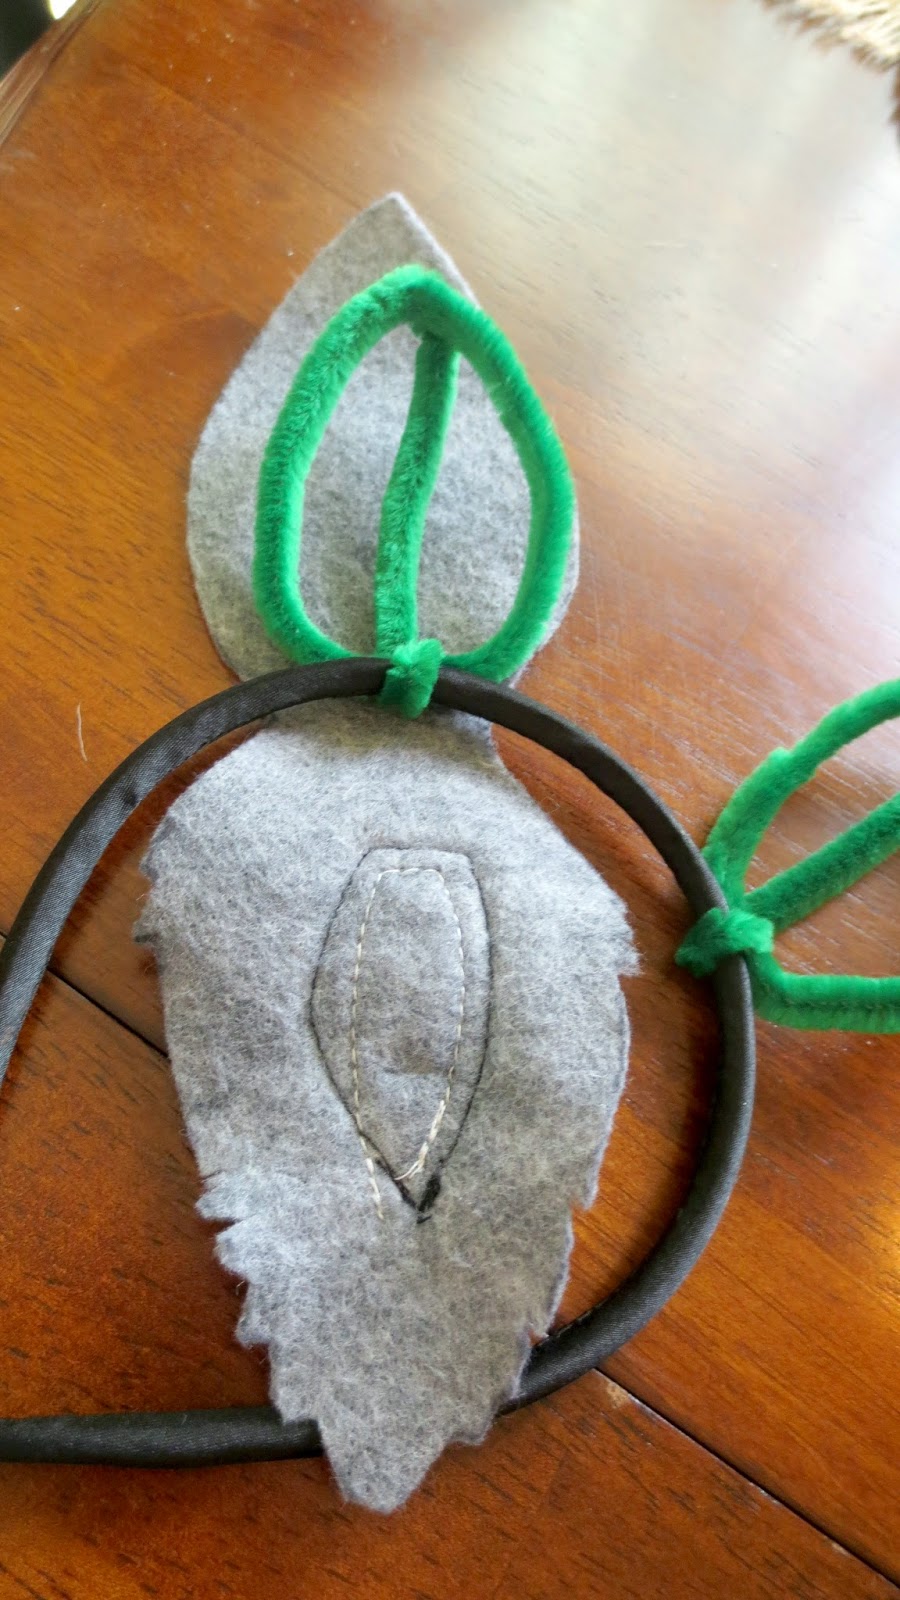
You will need two ears in gray felt, two inner ears in white, and two inner ears in black.  When I cut the ears out in gray felt, I added a few more fringes to my ear to make it look furry by making little triangles with my scissors.  Arrange the white and black inner ear how you like it and glue (or sew) them on the front part of your ear.  Do the same to the other ear.


Grab your pipe cleaners and make a circle with one of the ends and twist the wire around so it stays in place.


Now fold down the rest of the pipe cleaner so it looks like a Christmas tree.


Wrap the "trunk" of the tree around your headband and twist it tight so that it stays in place.


When you're done it should look like this.

 
Now take your felt ear and place it behind your pipe cleaner and hot glue it in place. 


Fold the felt ear up so that it sandwiches the pipe cleaner and glue it to the pipe cleaner.  Use your hot glue gun to secure the front of the ear to the back of the ear so that it won't flop open.  I used my fabric pen to lightly outline the edge of the ear to make it pop.  and YOU'RE DONE!    So easy, it's SPOOKY :)


Easy Graphic Transfer Project

I love projects that are extremely easy and only require a few supplies.  I especially love projects that are BOTH.  My mom gave me this old wood box that has been sitting in her garage for years.  Being the frugal girl that I am, I took it because it was free and I figured I could make something out of it.  It wasn't until I started browsing through The Graphics Fairy website that I decided I could turn this old boring box into something rustic and therefore fabulous.  I used this old french graphic I found HERE.  You will need to print out the picture that is the mirror image graphic.  The Graphics Fairy is awesome and already inverts the image for you.  All you do is follow the link and print it out.


Next, you will need to cover the graphic completely with Mod Podge (who doesn't love this stuff?) and lay it flat, face down where you want the graphic to go.  Make sure you smooth it out so there are no bubbles.  Now you get to wait for the graphic to dry.  I waited a couple hours just to be safe. When you feel like you've waited long enough, dip your finger in water and start to rub away the paper.  I learned the hard way that this needs to be done very gently or you'll lose some of the graphic.  I wanted mine to look old and worn so it actually worked out.  Just be careful!  Psst... If you're thinking to yourself, "Wow, she has baby hands" you'd be right.  Those are actually Lucy fingers.  She wanted to help :)


When you get the paper wet enough and rub, it should start to look like this.  I would rub away some and then wait for the paper to dry for a while and then come back to it and rub again.


When the rubbing was done, I put some Mod Podge over the top of it to seal it.  I think it makes a fun centerpiece for my little table.  Happy crafting!


Easy Coasters


 I really wanted my own coasters but couldn't find any that I liked.  I have little pops of turquoise (my favorite color!) in my living room and I wanted the coasters to fit my decor.  After a while I gave up looking for coasters in the store and decided I wanted to do it myself.  That's more fun anyway.  I made these coasters and it was EXTREMELY easy. 

 You will need...

1. Tiles
2. Mod Podge
3. Scrapbook paper

I found these tiles at the Dollar Store.  I like them because they already have a cork back on them.  I go to Hobby Lobby for my Scrapbook paper.  They have a big selection and each sheet is less than a dollar.  I decided to do 4 coasters and I had a lot of paper left over.  I grabbed two different sheets because I wanted to have two different patterns.

First, place the tiles on your scrapbook paper and trace around them and cut out your squares.  Get out your Mod Podge and a brush and cover the entire surface of the tile.  Lay the scrapbook paper on the tile and smooth it out so there are no bubbles.  When it is dry, cover the entire surface of the scrapbook paper with Mod Podge.  This will protect the paper from rings and water damage.  Give your coasters two more coats of Mod Podge and you're done!  You now have your own personal coasters! Easy peasy.


"As for Me..." Printable

 I love photo collages, especially when a quote is thrown in the mix.  The cute graphic at the bottom was made by Mandee  and I found her graphics on a guest post HERE .  If you're looking for cute graphics, I recommend going over to either Hannah's website at welivedhappilyeverafter.com or Mandee's at designsbymissmandee.blogspot.com.  Seriously, they are geniuses. 


r
If you're like me and would rather have this printed somewhere else than use up all your ink, you can find the picture HERE.   It's an 8x8 print.  If you have the ink for it, the pdf is HERE.  Thanks for stopping by!

This is the Life free printable


 I have a huge blank wall above my couch.  The wall was a blank canvas that drove me crazy until I figured out what to do with it.  Finally, I came across a post of a picture ledge on Pinterest and was inspired.  I had to have one!  I'm really happy with how it turned out.  The picture ledges are from Ikea (I love that store).  I bought three and put them close together to create one long shelf.  I wanted three short ones because I wanted the option to change it up later. The ampersand is from Michaels and I think it was only a $1.50.  I was going to paint it but I kind of like the raw look of it the way that it is.


 I created the "This is the Life" 8x8 printable in picmonkey and had it printed at Costco because I didn't want to waste computer ink.   If that's your route, you can find and download the printable HERE.  If you've got enough ink to spare you can find the pdf for the printable HERE.


Camping Trip

Camping is the best, especially with my family.  I look forward to it every year.  That doesn't mean our camping trips always go perfectly...sometimes it rains, or it's cold, or I get sunburned and bit,...(and using a porta potty for four days has it's own kind of horror....don't look in the hole...don't look in the hole!)  but it doesn't matter because every year I come back with fun family memories that I wouldn't change for anything.  This year we almost threw in the towel because we got there and all our favorite camp sites by the water were taken and all that was left was a tiny site that was a walk away from the lake.  We decided to take it anyway and I'm so glad we did.  I was so excited to take Lucy camping this year... and no, it wasn't her first camping trip.  We were crazy last year and took her camping when she was two months old.  This year she was 13 months and so much more fun.

I think right after I took this picture, she fell out of her little chair and got a face full of dirt.  Poor girl, but she sure looked cute sitting in her chair like a big girl! 


The best part about camping is sitting on the beach.  Ok, it's not exactly like sitting by the ocean but it's still peaceful and I got a great tan. 


My mom got these dog beds for Ranger and Zoey because they are always trying to climb up on the camp chairs to get out of the dirt.  Turns out, it was a greater hit with Lucy than with the dogs!  It was perfect!  We could zip her up in there and she was out of the sand and could play with her toys.  We brought it with us to Roaring Springs for Lucy a week later and a woman asked my mom where she got it.  She had to explain it was actually for dogs! haha.


Our tradition is to drive to McCall one morning to go to the Pancake House for breakfast.  Lucy found a chair that was just her size. 


Lucy did so good in the boat.  After a while, it would always put her to sleep. 


Lucy was nervous about the water at first, but after a while she was splashing and playing with her shovel.


Can't wait till next year!